Customer Portal FAQ
How do I get access to the Customer Portal?
- If you are an existing Customer and would like access to the customer portal, please reach out to your Local EFL representative.
New Account Verification and Logging In/Out
- Once your user account is issued, you will receive an email with the subject line "Please Confirm Your Email". This is a required step.
- Please note, you have 48 hours to confirm your account before the link expires. If your account is not verified, please reach out to your Local EFL Representative to have another confirmation link sent.

- A second email with the subject line "welcome to connectcast.io!" also be sent with password. that log into account.

Please see video below on how to verify your account.
Logging In/Out of Customer Portal
Link: efl.connectcast.io
- Enter the username and password provided via email.

- If a password is not available, click ‘Forgot your password?’, enter the username and
- click Submit. A new e-mail will be sent with a password reset option.
- Click Login to access the portal.
To Logout, click on the Logout buttons shown either at the bottom of the main menu or at the Top right corner of the platform.
How do I submit an eBooking?
• In the Bookings Module, select the Create Booking option.
• Enter the necessary details in the 05 sections that are required to complete a Booking.
The sections comprise of - Booking Details
- Notes
- Packing Info
- Containers (For Sea Freight, FCL shipments only)
- Review

Booking Details
- The sub sections that needs completed are further explained below,
Client
- The Organization can be selected and the Organization Type can be specified here.

References
- Any Purchase Order number or Shipper References can be entered.

Consignor
- Details in this section will auto populate if the selected Client is specified as the Consignor. If not, the relevant Consignor will have to be selected from the list of Consignors available.

Consignee
- Details in this section will auto populate if the selected Client is specified as the Consignee. If not, the relevant Consignee will have to be selected from the list of Consignees available.

Details
- All cargo related information can be entered here. All fields are required.
- Origin and Destination can be searched by city not UNLOCO.

Dates
- Estimated Times can be entered here.
- The Cargo Ready Date is mandatory.

Linked Order Details
- This section applies for Bookings created with a Purchase Order only.
- All the packline details of a Purchase Order will populate in this section.

Notes
- A Note can be entered under the available Note Type.
- This is not a Mandatory section.

Packing Info
- Any Packline information can be entered here.

- If the booking was Created with a PO, the existing Packline details will be available in this section.

Containers (For Sea Freight, FCL shipments only)
- The container information can be entered here.

Review
- This page will allow visibility of all the details that were entered in the previous pages.
- Upon accepting the details on the Review page, the new booking will be immediately created and subsequently, be available in the Customer Portal.
How do I link a PO to a eBooking?
If you are currently integrated with EFL and sending electronic PO files (850 EDI, Flat File, etc.) you are eligible to enable the eBooking by PO feature.

When creating a booking from existing Purchase Orders, check the box next to the Orders you’d like to create a booking for. Then click “Create Booking” .

You’ll receive a pop-up confirming you want to book the selected PO’s. Click “OK”.
You’ll receive another pop-up that ensure no conflicts are arising with the creation of this booking. Click “Create Booking” to continue.
There are 5 sections to fill out within the “Create a Booking” – each image below is numbered in order.
1. Client: Client name is auto-populated
2. References: Autofilled by Selected PO’s from previous screen.
3. Shipper: The shipper will auto-populate
4. Consignee: The consignee will auto-populate.
5. Details: Enter the shipments dims, details, incoterms, origin, destination, goods description, and more.
6. Dates: Selection of dates are available to enter. Please note Cargo Ready Date is required.

References
The “Order Reference” field will automatically populate with the Purchase Orders selected when creating this booking.

Consignor
The fields in this section will automatically fill in based on your account information. This is read only and cannot be edited.

Consignee
The fields in this section will automatically fill in based on the customer information.

Details
None of the fields in this section are mandatory, except for the Cargo Ready Date.

Linked Order Details
Nothing to enter in here. This sections shows the linked order details.

Notes Section

The Notes Section is optional, but can be used to add special notes or export instructions. Click the “+” sign on the left to start adding note lines.

You can click “Skip”, without entering notes to go to the next page. Or, if you entered notes you can click “Save/Next”.
Packing Line Info Section

The packing line info section is where you will add the detail for each individual PO, if you selected multiple PO’s for this booking. Otherwise, you will just enter the one line reconfirming the quantity being booked.

After entering the proper Packing Line information, click on “Save/Next” button. Please note that the weight and dimensions entered should be for each carton.
Containers Section - (FCL Shipments)

The Containers Section will only appear if you selected “FCL - Full Container” for the Container Type Module dropdown that was under the details section on the first page of the Booking creation. Click the “+” button to start adding containers. You will need to select the container type, the number of that container type, and the commodities being contained.

After entering the proper container information, click on “Save/Next” button.
Review Section


The Review Section displays all the information entered during the booking creation process. If all information looks correct, you can go ahead and hit “Submit Booking” button.
You’ll get a pop-up asking you to confirm creation of the booking. Press the “OK” button.

You’ll get another pop-up message showing booking creation was successful. This message will also tell you the booking reference number that will tie to the Purchase Order #.

Email Confirmation
Below is content of the Booking Submission confirmation email you will receive once the booking is confirmed in the system. It will provide a light summary of the details from your booking.

How do I find my Booking/Shipment?
- You can find any specific record of a Purchase Order, Booking or Shipment in the Customer Portal by Using The Available Filters.
- The Parameter Types are the same for all 03 Modules. Only the criteria available in the dropdown will change according to the Modules.
- Also, there are Quick Filters that will change according to the Module you are in.
- The Main Filters available are as follows:

Client - This filter will provide a dropdown of all the Clients that the Logged In user will have been given access to.
Mode - This will further Filter the data according to the Mode of Transportation. If not required to specify, the "All" option can be selected.
Search Type - This dropdown includes a list of Criteria specific to each Module. The " All " option can be selected if no requirement to select an available option.
Reference # - This Filter goes Hand in Hand with the Search Type Filter. Any specific Record Number can be entered here.
Date Filters - The rest of the Filters are Date Filters that can help specify a Timeline when searching for any record.
- The "Column Headers" change according to the Module you are in. The filtering option available underneath each filter will allow to further filter the already Filtered results.
- The below Video will take you through the available Filtering Options
How do I upload documents to a Booking/Shipment?
• Search for the Booking or Shipment record.
• Open the Record by clicking on the Shipment record number Hyperlink and go to the Documents area.

• To Add Documents, click on the "Add" button. Below pop-up will appear,

• Select the Document Type from the dropdown and click on "Submit" to upload the Document.

• The page will automatically refresh and the uploaded Document will be available in the Documents section.

• Clicking on the "Download All" button will download all the available documents to a Zip Folder.

How do I Customize my View?
In this example I am going to use the Shipping Module. This works in ALL modules in the portal.
There are two ways we can customize our views.
- We can start with selecting the header and click and drag to the desired spot.

- Our second way is by clicking the "Customize View".
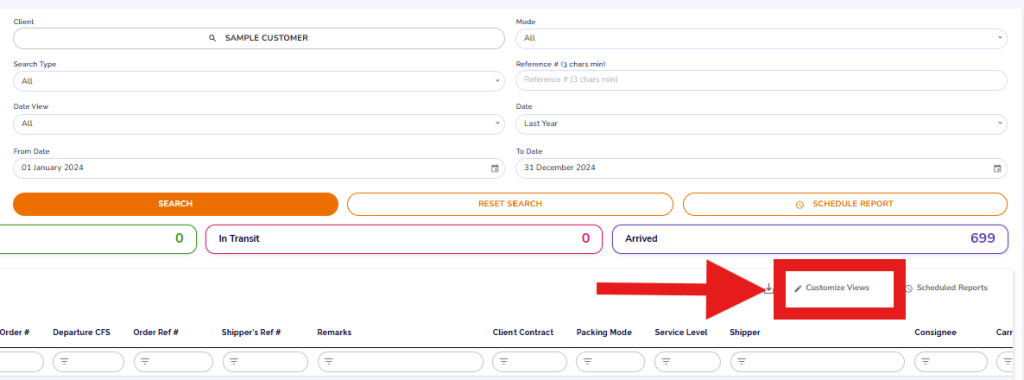
- A pop up will appear, this will allow you to click and drag to organize the order of these fields.
- By clicking the check box, you are also to add and remove the headers you would like.
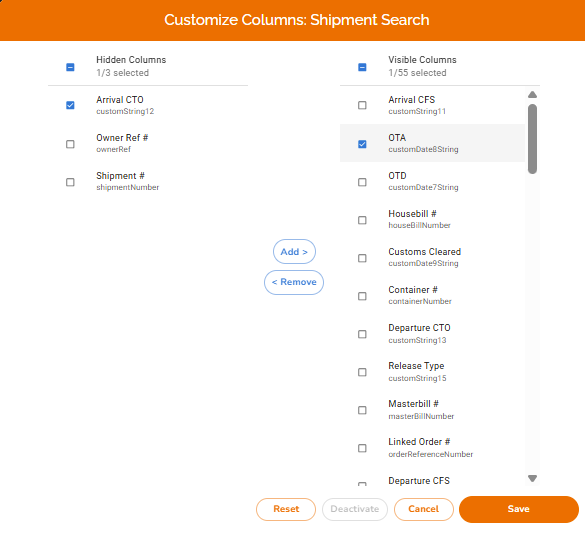
Once you have adjusted the view how you would like. Click Save.
How do I extract a DSR from the Customer Portal?
• Enter the required criteria in the Search Filters and click on "Quick Search" to generate the results.
• Click on the "Export" Icon.

• All Search results will be extracted to an Excel Sheet.

• This File will be your DSR.
How Do I Schedule a Report?
The purpose of the Scheduled Reporting is to allow DSR reports to be sent out
automatically at the desired interval (Daily, Weekly, Monthly). To get started, navigate
to the Shipment Module in the EFL Customer Portal. The search parameters in the
module will serve as the foundation of the scheduled report
1. Setup
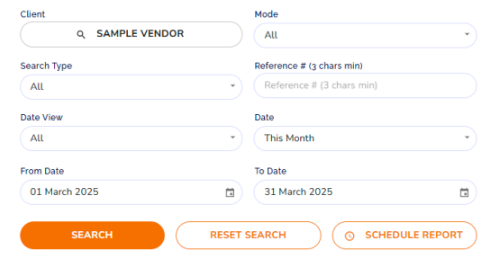
Begin by playing with the search parameters until the desired shipment data is
showing visible in the portal.
For best results leave the ‘Search Type’ set to “All”.
When setting the date range, keep in mind, the fixed date ranges like, “This Month”
will keep a rolling window of visibility going back the described time frame.
Once the anticipated Client, Mode, Date View, and Date Range is selected, click on
the ‘Schedule Report’ button.
2. Scheduling
Now the ‘Create New Scheduled Report” pop-up window will appear. This is where
the final details can be entered to finish scheduling the report.
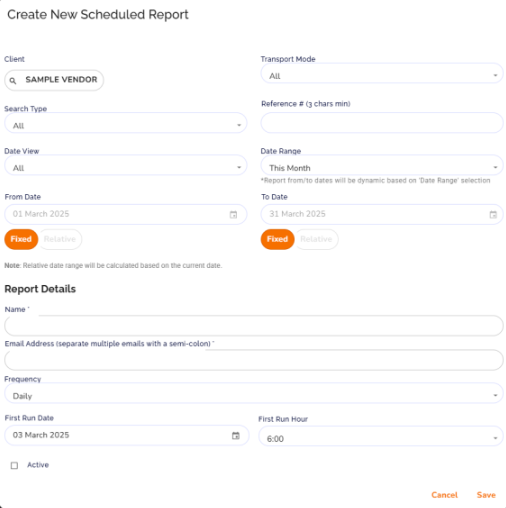
On the top section you will be able to adjust all the parameters of the report you will
be running. Make sure you have the correct Client selected and then move on to
making sure you are getting the Transport Mode, Search Type, and Date Range you
are interested in.
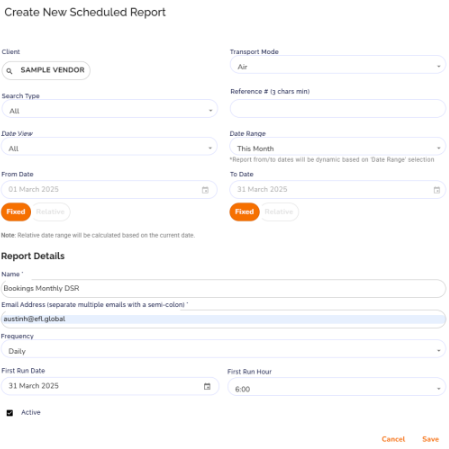
Enter a name for the report.
Then enter the email address of the recipient(s) of the report.
Please note, multiple email addresses can be added by adding a “;” semicolon after
each email address.
Then select the Frequency, First Run Date, and First Run Hour from the dropdowns.
(The Date and Time will be based on the user creating the report’s timezone)
Now you will make sure the ‘Active’ Checkbox is selected. ---> ![]()
Then you will click ‘Save’
Now the report will be comfirmed active and you will see your scheduled report on the
list.

Troubleshooting FAQ
When issues arise that are causing a search to not load or a booking to not be created, please try the following solutions before reaching out to customer support.
Hard Refresh
This is a simple solution. Simply press CTRL + F5 at the same time and the page will hard refresh. This could help if there is an issue with data populating or the page looks stuck.
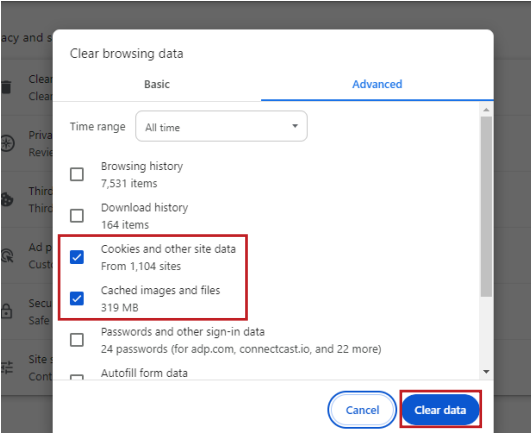
Clear Cache & Cookies
For this solution please follow the below steps to clear your cache and cookies before resuming what you were doing on the Customer Portal. This is for Google Chrome users, but most browsers will have a similar layout and naming convention.
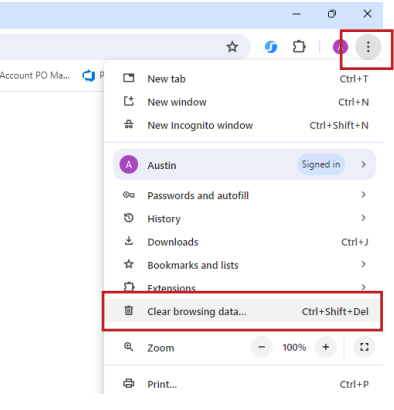
Go to the bullet points on top right of your browser, and then select clear browsing data. When issues arise that are causing a search to not load or a booking to not be created.
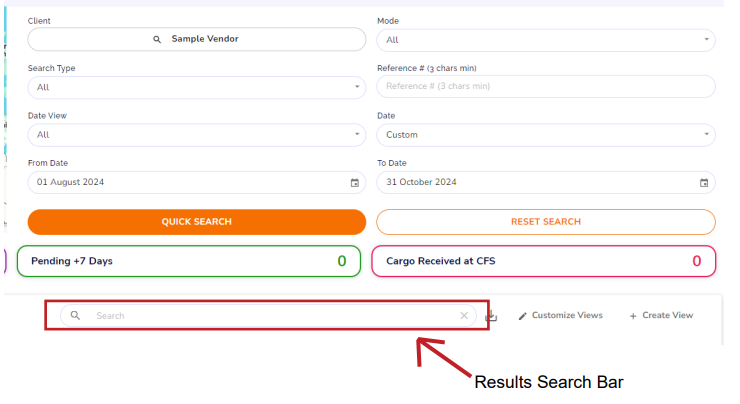
Trouble With Utilizing Search Functionality
When utilizing the search functionality on any of the modules, it is sometimes best to use a broader search pattern, and then utilize the Results Search Bar to narrow down from there. The best way to do this is to set the Search Type, Date View, and Mode to the “All” selection. Then you want to use a wide range on the “From Date” & “To Date” fields.
Forgot Your Password
Currently EFL IT team cannot reset your password for the Customer Portal. In order to reset your password please click on “Forgot your password?” on the login screen. Then follow the prompt to receive a password reset email.
Login Issue - Check URL
If you have issues logging in, please make sure to check that the URL is “efl. connectcast.io”. Sometimes people will bookmark the full link after clicking on the confirmation email button. This will cause you to go load an error page. Make sure to bookmark “efl.connectcast.io” to always have the correct path.