Customer Portal FAQ
How do I get access to the Customer Portal?
- If you are an existing Customer and would like access to the customer portal, please reach out to your Local EFL representative.
New Account Verification and Logging In/Out
1. Email Verification
Once your account has been created, you will receive two emails:
- A verification email titled: “Please confirm your email”

- A separate email containing your temporary password

Important:
- The verification must be completed within 24 hours
- If the link expires, you will not be able to access the portal
If your verification link has expired:
- Please contact your EFL Representative to request a new verification email
2. How to Log into the Portal
Access the Customer Portal here:
https://efl.connectcast.io
To log in:
- Enter your username and password provided via email
- Click Login to access the portal
If you do not have a password:
- Click “Forgot your password?”
- Enter your username or email address
- Click Submit
Follow the instructions in the email to reset your password

3. Login Errors & Troubleshooting
The Customer Portal is a self-service platform, meaning users are responsible for managing their own login credentials.
Common Login Issues
- Incorrect password
- Email not verified
- Expired verification link
Password Reset Process
EFL does not perform manual password resets.
If you are unable to log in due to a password issue:
- Click “Forgot your password?” on the login page
- Enter your registered email address
- Follow the instructions sent via email to reset your password
How do I submit an eBooking?
Creating a Booking

To Begin:
Navigate to the Create Booking tab.
Under Booking Details, complete the following sections:
1. Client
- The client name is auto-populated.

2. References
- Enter Order Numbers and other reference IDs in the Order Reference field.

3. Shipper (Consignor)
- These fields auto-populate based on your account information.
- This section is read-only and cannot be edited.

4. Consignee
- Click Select Consignee to choose from the dropdown.
- Then click Select Address to confirm the delivery address.


5. Details
Enter all required shipment information, including:
- Dimensions
- Weight
- Incoterms
- Origin
- Destination
- Goods description
- Container Type
All fields in this section are mandatory.

6. Dates
- Enter applicable shipment dates.
- Cargo Ready Date is required.

Linked Order Details
This section displays linked order information, if applicable.
No action is required.

Notes Section
This section is optional.
You may use it to add special handling notes or export instructions.


- Click the “+” icon to add notes.
- Click Save/Next to proceed.
- If no notes are required, click Skip.

Packing Line Information
In this section, enter details for each PO Line or Package Type.

Click Save/Next after completing each entry.
- Ensure weight and dimensions are entered per carton, per line item.

Containers Section
(FCL and FTL Shipments Only)
This section appears only if you selected:
- FCL – Full Container, or
- ROA – Full Truckload
To add containers:
- Click the “+” icon.
- Select container type.
- Enter quantity.
- Select commodities.
Click Save/Next once complete.

Review and Submit

The Review section displays all booking details entered.
- Confirm accuracy.
- ClickSubmit Booking.
- Click OK to confirm.

A confirmation message will appear with your Booking Reference Number, which links to the Purchase Order.

Email Confirmation
Once submitted, you will receive a booking confirmation email summarizing the key shipment details.

Create a Template
The Booking Template feature allow
s users to save booking details and reuse them for future bookings, reducing manual data entry and improving efficiency for repeat shipments.
How to Create a Booking Template
- Navigate to Create Booking in the Customer Portal.
- Enter all required booking details as you normally would.
- Proceed through each step until you reach the Review page.
Click Save As Template.

- Enter a Template Name when prompted
- Click OK to save the template.


How to Use a Booking Template
- Navigate to Create Booking.
Click Load From Templat

- Select the desired template from the list.

- The booking fields will auto-populate with the saved template data.
- Review and update any fields as needed.
- Complete and submit the booking as usual.

How do I link a PO to an eBooking?
Introduction
The purpose of this guide is to walk you through the process of creating a booking using a Purchase Order (PO) in the Customer Portal.

Order Module
Step 1: Locate the PO
Navigate to the Order Module and search for the PO you would like to book.
Once you have located the correct PO:
Select the checkbox next to the PO
Click “Create Booking.”
Note:You may select multiple POs if needed.

You will receive a pop-up message asking you to confirm that you want to create a booking for the selected order(s). Click “OK.”

A second pop-up will appear notifying you if there are any errors preventing the booking from being created.

Common Error:
The most frequent error occurs when a PO is already attached to an existing shipment. If you receive this message, please contact your EFL representative for assistance.
Create the Booking
Detail Page
Once you enter the Create Booking page, the system will automatically populate default information based on the PO.
For example:

If you are the Shipper/Consignor, the Consignor field will default accordingly.
References
In the References tab, you will see the selected PO(s) associated with this booking

Consignor
The Consignor information will automatically populate based on the records in our system.
If you need to update the address:
Click “Select Address”
Choose the correct address

Consignee
The Consignee information will also default based on the PO details in our system.
If changes are required:
Click “Select Address”
Choose the correct address

Details
In the Details section, enter all required shipment information. Some fields may already be populated based on the PO data.

Important:
All fields in this section are mandatory and must be completed before proceeding. In the Dates section: Only the Cargo Ready Date is mandatory.

Linked Orders
This section displays the PO information currently attached to the booking.

Creating a Booking on behalf of the Consignee and Consignor
If you are creating a booking and you are not the Consignee or Consignor:
Change the Client Selection at the top of the page to “Other.”
This will allow you to manually update the Consignee and Consignor detail.

In each section:
Click “Select Consignee” (or “Select Consignor”)
Choose the appropriate party
If you are unable to locate the correct Consignee or Consignor, please contact your EFL representative for assistance.

Notes
There are two types of notes that can be added to a booking:
Export Pickup Instructions
Special Instructions
You may add only one entry per note type. However, the text field allows unlimited characters. If no notes are required, click “Skip.”

Packing Info
The Packing Line Information section allows you to enter packing line details for the shipment.

Linked Orders Lines
If booking by PO, you may select specific PO lines to automatically populate the booking details. If no additional information is required on this page, click “Skip.”

Review
The final step is the Review page.
Here, you can:
Review all submitted information
Confirm accuracy
Once confirmed:
Click “Submit Booking.”

A pop-up message will appear asking you to confirm submission. Click “OK.”

After submission:
- A confirmation pop-up will display the Booking Reference Number.
- You will also receive a confirmation email indicating that the booking has been successfully created.


How do I find my Booking, Shipment or Container?
Introduction
You can search for specific records across the Booking, Shipment, and Container modules in the Customer Portal using the available filters.
The filter parameters work the same way across all three modules. Only the options within each dropdown will vary depending on the module you are in.
Main Filters

Client - A dropdown listing all clients the logged-in user has been granted access to.
Mode - Filters results by mode of transportation. Select "All" if no specific mode is required.
Search Type - A dropdown with criteria specific to each module. Select "All" if you do not need to narrow by a specific type.
Reference# - Works in conjunction with the Search Type filter. Enter a specific record number to locate a particular entry.
Date Filters - The remaining filters allow you to define a date range to narrow results by timeline.
Note: You may select multiple POs if needed.
Quick Filter Buttons
Quick filter buttons appear at the top of each module and update dynamically based on the module you are viewing.
Booking Module

| Button | Description |
| Total Bookings | The total number of bookings returned by the search. |
| Pending 0–7 Days | The booking ETD or Booking Date is 0–7 days in the future, or is in the past, and no Cargo Receipt Date has been recorded. |
| Pending +7 Days | The booking ETD or Booking Date is more than 7 days in the future, and no Cargo Receipt Date has been recorded. |
| Cargo Received at CFS | The booking has a Cargo Receipt Date on record. |
Shipment Module

| Button | Description |
| Total Shipments | The total number of shipments returned by the search. |
| Booked | The shipment ETD is still in the future. |
| Departed | The shipment ETD is within 2 days of the current date. |
| In Transit | The shipment ETD is in the past and the shipment ETA is in the future. |
Arrived | The shipment ETA is today or in the past. |
Container Module

| Button | Description |
| Total Containers | The complete count of all containers in the current results, regardless of status. |
| On the Water | The container is currently in transit between ports. It has departed (ATD recorded) but has not yet arrived (no ATA recorded). |
| Arrived | The container has reached the destination port but is not yet available for pickup. An ATA has been recorded, but the container has not been released for collection. |
| Available | The container has been processed and is ready for pickup at the destination. The available date has been set and passed, but delivery has not yet been completed. |
Delivered | The container has reached its final destination and delivery is complete. A delivery completion date has been recorded. |
Purchase Order Module

| Button | Description |
| Total Orders | The total number of orders returned by the search. |
| Pending | The order does not meet the conditions for Overdue or Shipped. |
| Overdue | The order's Ex-Works Required By date or Ex-Factory Estimate date is in the past. |
| Shipped | The order has an Actual Time of Departure (ATD) recorded. |
How do I upload documents to a Booking/Shipment?
Documents Tile
Used to upload supporting documents.

To upload:
Click + Add.
Select document type from the dropdown.
Click Choose File.
Click Submit.


Reports & Views
Introduction
This guide covers the three ways you can control and export data in the EFL Customer Portal: customizing your column views, downloading an instant report, and scheduling automated reports. These features are available across the Purchase Order, Booking, Shipment, and Container modules.
1. Customize Views
Each module allows you to personalize which columns are displayed and in what order, so the information most relevant to you is always visible.
Rearranging Columns Directly
You can reorder columns without opening any menu. Simply click and drag any column header left or right to reposition it. The change takes effect immediately in your current view.

Using the Customize Views Panel

For more control, click the Customize Views button in the top right of any module. A panel will appear titled Customize Columns, showing two lists:

- Hidden Columns - Fields currently hidden from your results table.
- Visible Columns - Fields that are active and visible in your current view.
You can click and drag columns between the two lists, or select them and use the Add and Remove buttons to move them across. Once you are satisfied with your selection, click Save. You can return to the original layout at any time using the Reset button.
Note: The Select View dropdown at the bottom of the panel allows you to switch between saved views. If you have previously saved a custom view, you can activate it here or delete it if it is no longer needed.
2. Download a Report
If you need a one-time export of your current results, you can download it directly without setting up a scheduled report.

After applying your search filters in any module, click the download icon in the top right corner of the results table. The exported file will reflect exactly what is displayed on screen - including any column customizations you have applied.
Tip: Customize your column view before downloading to ensure the export contains only the fields you need.
3. Scheduled Reports
Scheduled Reports allow you to have a report automatically sent to one or more email recipients at a set interval — Daily, Weekly, or Monthly. The search parameters you configure in the module serve as the foundation of the report.

Step 1 - Set Up Your Search
Begin by adjusting the search parameters in the Shipment Module until the desired data is displayed in the portal.
- For best results, leave the ‘Search Type’ set to “All”.
- When setting the date range, keep in mind that fixed date options such as “This Month” will maintain a rolling window, always looking back the described time frame from the current date.
- Once the Client, Mode, Date View, and Date Range are selected, click the ‘Schedule Report’ button.

Step 2 - Configure the Scheduled Report
The Create New Scheduled Report window will appear. This is where you enter the final details to complete the setup.

In the top section, confirm the search parameters for the report - Client, Transport Mode, Search Type, and Date Range.
- Enter a name for the report.
- Enter the email address of each recipient. To add multiple recipients, separate each email address with a “;” semicolon.
- Select the Frequency, First Run Date, and First Run Hour from the dropdowns. The date and time are based on the time zone of the user creating the report.
- Make sure the ‘Active’ checkbox is selected.
- Click Save.
Report Columns
At the bottom of the Create New Scheduled Report window, you will find a Report Columns section. This allows you to customize exactly which columns appear in your scheduled report - independently of your saved views in the portal.
There are two lists:
- Available Columns - all fields that can be added to the report. Click the + button next to any field to add it.
- Report Columns - the fields that will be included in the report. Click the − button to remove a field, or click and drag the handle on the left to reorder the columns.
Note that these column selections are fixed to this specific report and will not change if you update your saved views elsewhere in the portal.

Step 3 - Confirm
Once saved, the report will be marked as active and will appear on your scheduled reports list. It will run automatically at the frequency and time you selected.
Troubleshooting FAQ
When issues arise that are causing a search to not load or a booking to not be created, please try the following solutions before reaching out to customer support.
Hard Refresh
This is a simple solution. Simply press CTRL + F5 at the same time and the page will hard refresh. This could help if there is an issue with data populating or the page looks stuck.
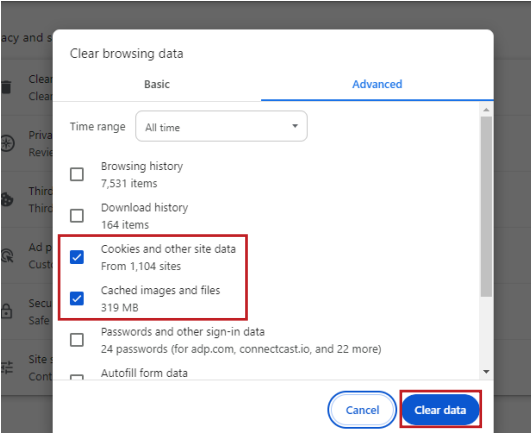
Clear Cache & Cookies
For this solution please follow the below steps to clear your cache and cookies before resuming what you were doing on the Customer Portal. This is for Google Chrome users, but most browsers will have a similar layout and naming convention.
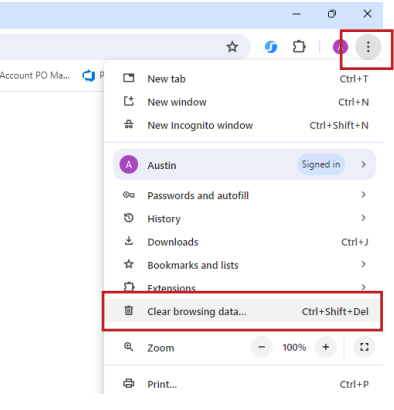
Go to the bullet points on top right of your browser, and then select clear browsing data. When issues arise that are causing a search to not load or a booking to not be created.
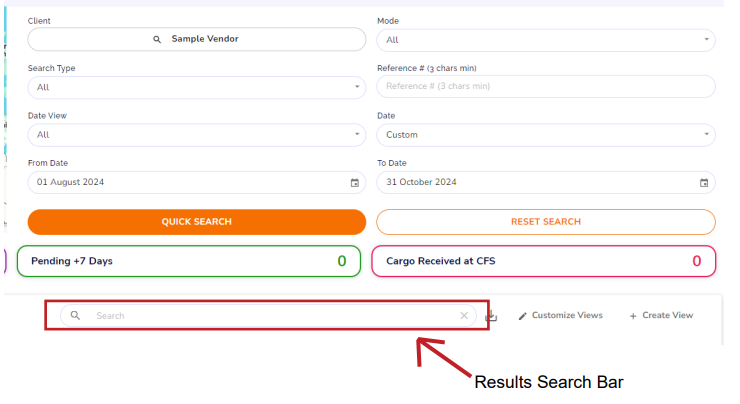
Trouble With Utilizing Search Functionality
When utilizing the search functionality on any of the modules, it is sometimes best to use a broader search pattern, and then utilize the Results Search Bar to narrow down from there. The best way to do this is to set the Search Type, Date View, and Mode to the “All” selection. Then you want to use a wide range on the “From Date” & “To Date” fields.
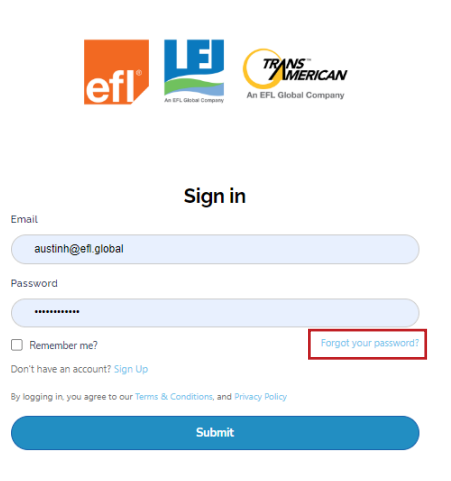
Forgot Your Password
Currently EFL IT team cannot reset your password for the Customer Portal. In order to reset your password please click on “Forgot your password?” on the login screen. Then follow the prompt to receive a password reset email.
Login Issue - Check URL
If you have issues logging in, please make sure to check that the URL is “efl. connectcast.io”. Sometimes people will bookmark the full link after clicking on the confirmation email button. This will cause you to go load an error page. Make sure to bookmark “efl.connectcast.io” to always have the correct path.